Table of Contents
Open Table of Contents
Code Interpreter 是什么?
在前一段时间 ChatGPT Code Interpreter 推出后,大家应该都已经对它有了一些认识,知道它是什么、可以做什么,所以这里不再重复解释这些基础问题,这次我们换一个角度,从流程和要素的角度来看看怎么理解 Code Interpreter。
Loading graph...
在常规的 ChatGPT 交互中,流程和要素是:Prompt => Output Text,这也是为什么 ChatGPT 刚推出的时候马上涌现出了 Prompt Engineering 的概念以及配套构建 Prompt 的 embedding 工作,因为它的流程短,要素简单,构造出一个好的 Prompt 就是这个流程中的关键。对于 Code Interpreter 来说,它的流程和要素是这样的:Prompt => Code ==Interpreter==> Output(Description, Image, File…)。这带来了一些变化:
- Prompt 构造不再是直接面向输出,而是生成中间代码
- 需要一个代码解释器,能够区分会话、执行代码,保存中间变量等
- 输出变得更加多样,可以是图片、文件等
为什么要实现 Code Interpreter
ChatGPT 已经实现了 Code Interpreter,依托于 OpenAI 的 GPT 模型,能力也很强大,为什么还需要实现一个自己的 Code Interpreter?除了向行业领头羊看齐以及对接公司内部模型能力外,我们还可以想一下自己来实现会有什么增量。可以看到的典型增量有:
- 能够与实时数据交互:ChatGPT 的 Code Interpreter 不具有 Plugins 的联网能力,开启 Code Interpreter 后就不能再选中 plugin,这导致 ChatGPT Code Interpreter 的数据实时性不足,不能做类似于“将 2023 年苹果公司的股市表现绘制成图”这样的事情
- 能够与更多环境交互:本地或云端部署之后,就拥有了更自由的环境,无论是操作文件系统,还是调用 API,安装 ChatGPT Code Interpreter 不支持的包等,都成为了可能
实现 Code Interpreter 的思路
要实现 Code Interpreter 有两个核心关注点:一是借助模型能力,比如 OpenAI API 的 Function Calling 能力产出要调用的代码;二是拥有一个能执行 Python 代码的环境,例如用户指定要输出一个正弦函数图,那么需要得到绘制正弦函数图的代码,然后送到 Python 解释器中执行,输出图片然后展示给用户。在这个过程中 LLM Agent 可能还要对结果做一些解释和细节补充。此外还需要考虑文件 IO 以及会话中变量保存的能力。
如果用 LangChain 来实现的话,这会更加方便,这里 Python 解释器和文件 IO、变量保存都可以看作是 LangChain 的一个 Tool,把它塞到 LangChain 里 Agent Executor 里来调用。按照这个思路社区已经有了开源的实现:codebox-api ,可以把它注册成 LangChain Tool。除了提供代码执行的核心能力的 Tool,我们还需要一些周边来实现:会话管理、发起 Kernel 调用、文件 IO,即每当创建一个新的会话时,就创建一个新的 Jupyter Kernel channel 来执行代码,之后将执行结果按照输出的类型分门别类反馈给用户,这一部分上面的 codebox-api 的作者也把它封装成了解决方案:codeinterpreter-api。
实现 Code Interpreter 的设计
接下来是对 codeinterpreter-api 项目的梳理拆解,看下具体怎么设计和实现上述的思路。由于项目主要是用 LangChain 来编排整个流程的,这里先补充说明一下项目用到 LangChain 部分的基础概念:
LangChain 中的部分基础概念:
- LangChain Agents:LangChain 中的一个基础模块,核心思想是用 LLM 来选择要采取的一系列动作。与硬编码在链(chains)中的动作序列不同,代理(agents)使用语言模型作为推理引擎来决定要采取的动作及其顺序。
- LangChain Tools:Tools 是 Agent 调用的能力。主要有两个方面需要考虑:给 Agent 提供正确的工具,并以对 Agent 最有帮助的方式描述这些工具。在面向 Code Interpreter 创建自定义 StructuredTool 时需要定义:name, description, func(同步调用的函数), coroutine(异步调用的函数), args_schema(输入的 schema)
- LangChain Agent Executor:Agent Executor 是 Agent 的运行时。它实际上调用 Agent 并执行它选择的动作。这个执行器还做了一些额外的降低复杂性的工作,例如处理:Agent 选择不存在的 Tool、Tool 出错、Agent 产生无法解析为 Tool 调用的输出等情况
流程设计与实现
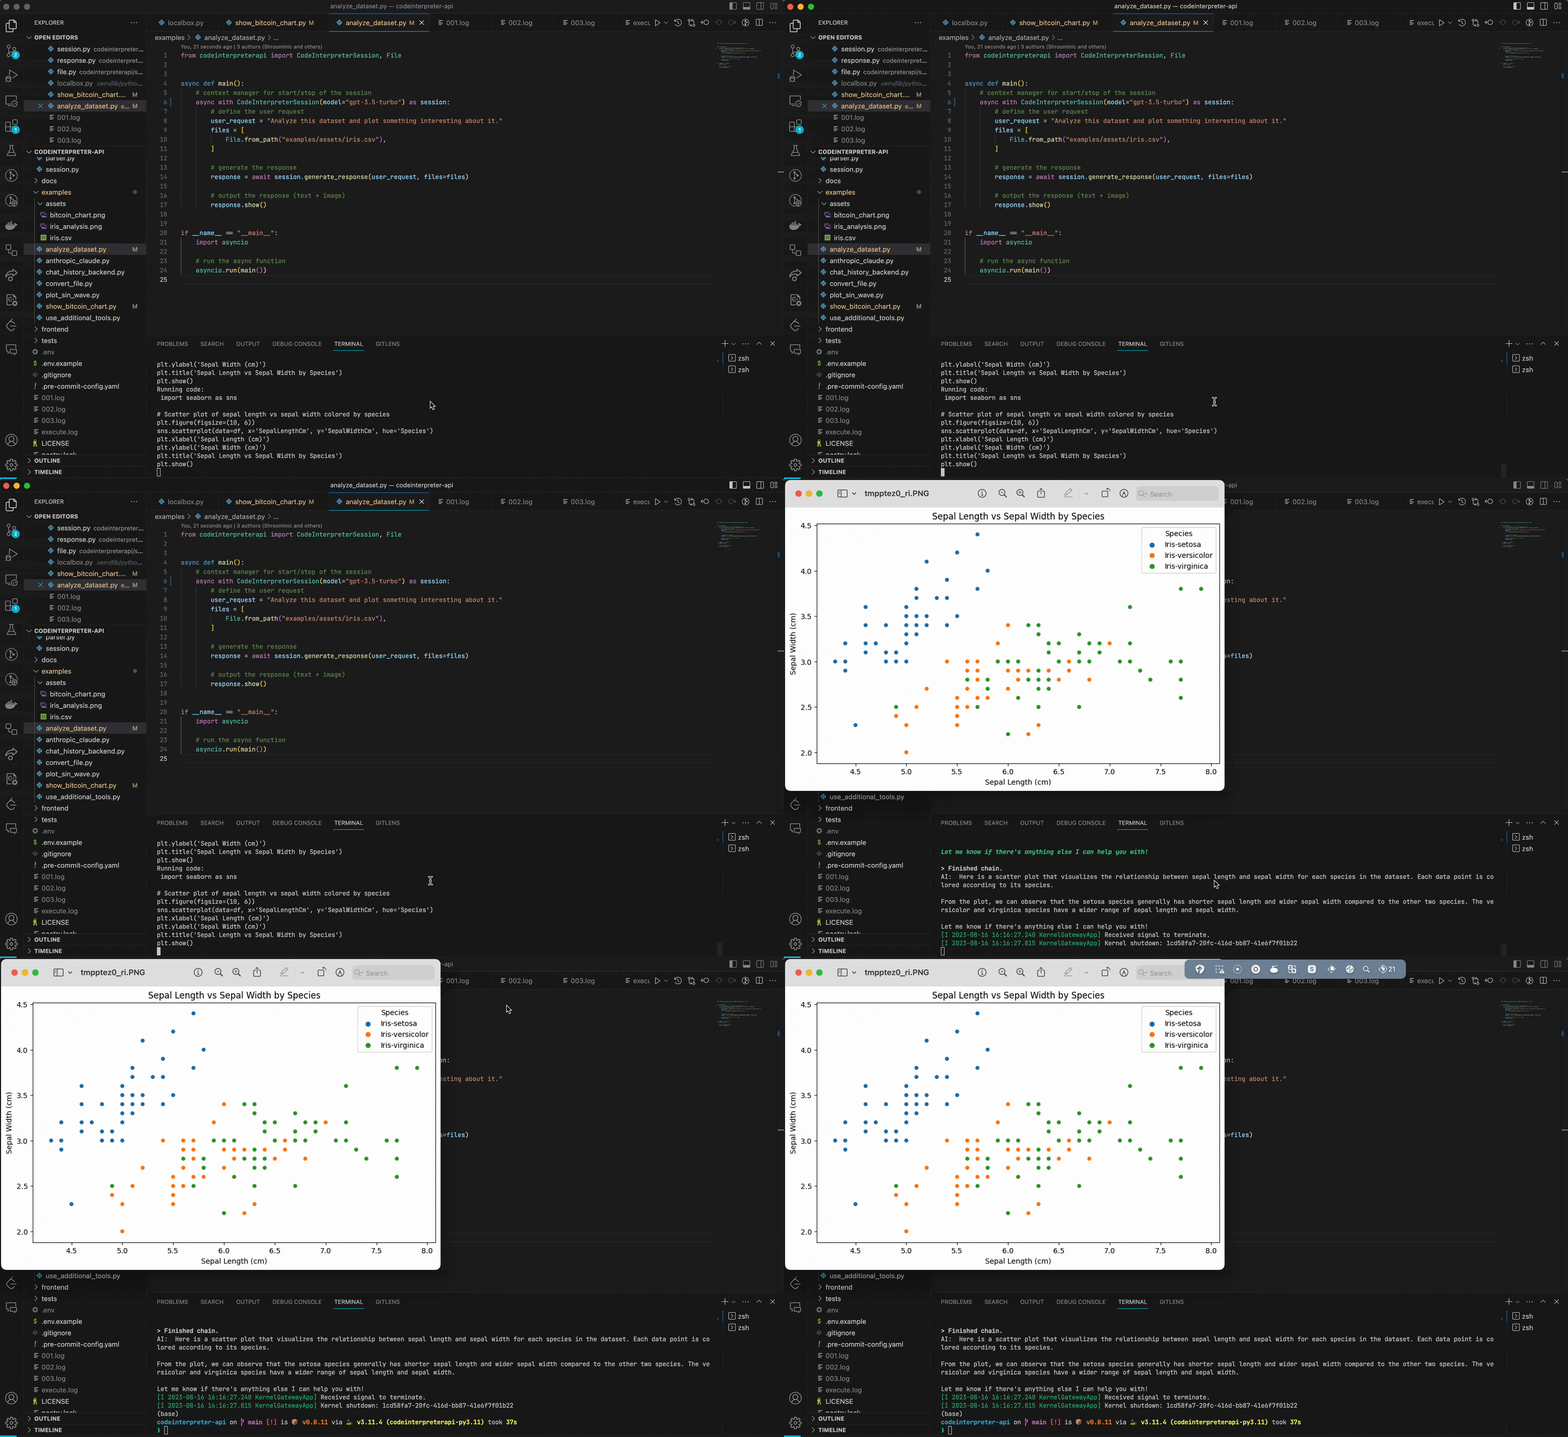
在有了上述基础概念之后,就可以来看怎么基于 LangChain Agent 实现 Code Interpreter 了,我们通过下面这段代码来看具体的执行流程:
from codeinterpreterapi import CodeInterpreterSession, File

async def main():
    # context manager for start/stop of the session
    async with CodeInterpreterSession(model="gpt-3.5-turbo") as session:
        # define the user request
        user_request = "Analyze this dataset and plot something interesting about it."
        files = [
            File.from_path("examples/assets/iris.csv"),
        ]
        # generate the response
        response = await session.generate_response(user_request, files=files)
        # output the response (text + image)
        response.show()

if __name__ == "__main__":
    import asyncio
    # run the async function
    asyncio.run(main())
效果如图所示:

执行环境和工具实例化
通过 with 创建 session 时,就要开始实例化 jupyter kernel 以及 agent executor,以下是一些关键的步骤:
- 通过
jupyter-kernel-gateway创建与 Jupyter kernel 通信的服务并检测启动成功的状态
self.jupyter = await asyncio.create_subprocess_exec(
	python,
	"-m",
	"jupyter",
	"kernelgateway",
	"--KernelGatewayApp.ip='0.0.0.0'",
	f"--KernelGatewayApp.port={self.port}",
	stdout=out,
	stderr=out,
	cwd=".codebox",
)
self._jupyter_pids.append(self.jupyter.pid)

# ...
while True:
	try:
		response = await self.aiohttp_session.get(self.kernel_url)
		if response.status == 200:
			break
	except aiohttp.ClientConnectorError:
		pass
	except aiohttp.ServerDisconnectedError:
		pass
	if settings.VERBOSE:
		print("Waiting for kernel to start...")
	await asyncio.sleep(1)
await self._aconnect()
指定 stdout 和 stderr,同时记录进程 pid 以及将这个 kernel 实例关联到 session 上。在 kernel 创建好以后,再发送 HTTP 请求,建立与 kernel 之间的 websocket 连接。
- 创建 Agent Executor
def _agent_executor(self) -> AgentExecutor:
	return AgentExecutor.from_agent_and_tools(
		agent=self._choose_agent(),
		max_iterations=9,
		tools=self.tools,
		verbose=self.verbose,
		memory=ConversationBufferMemory(
			memory_key="chat_history",
			return_messages=True,
			chat_memory=self._history_backend(),
		),
	)

def _choose_agent(self) -> BaseSingleActionAgent:
	return (
		OpenAIFunctionsAgent.from_llm_and_tools(
			llm=self.llm,
			tools=self.tools,
			system_message=code_interpreter_system_message,
			extra_prompt_messages=[
				MessagesPlaceholder(variable_name="chat_history")
			],
		)
		# ...
	)

def _tools(self, additional_tools: list[BaseTool]) -> list[BaseTool]:
	return additional_tools + [
		StructuredTool(
			name="python",
			description="Input a string of code to a ipython interpreter. "
			"Write the entire code in a single string. This string can "
			"be really long, so you can use the `;` character to split lines. "
			"Variables are preserved between runs. ",
			func=self._run_handler, # 调用 CodeBox 同步执行
			coroutine=self._arun_handler, # 调用 CodeBox 异步执行
			args_schema=CodeInput,
		),
	]
这里定义了使用 OpenAIFunctionsAgent,有需要我们可换成自己的 Agent,只是现在只有 OpenAI 的 API 有方便又强大的 Function Calling 能力,所以我们以这个举例。这里还同时指定了 Agent 以及 Agent Executor 会用到的 Tool,Tool 的定义包含名称和描述以及其它用于执行 python 代码的参数,其中上一步创建的 jupyter kernel 实例被 CodeBox 做了进一步封装,再作为同步和异步调用方法传递到 Tool 中。
处理输入的文本和文件
因为 Prompt Engineering 是一个可以外置的步骤,用户使用时应该将 Prompt 构建好再传进来,所以这一步框架本身没有做太多工作,只是将传入的文本和文件做了简单的 Prompt 追加(比如给到 LLM 用户指定了使用哪些文件),同时将文件记录到 CodeBox 实例中方便后续执行。
class UserRequest(HumanMessage):
    files: list[File] = []

    def __str__(self):
        return self.content

    def __repr__(self):
        return f"UserRequest(content={self.content}, files={self.files})"

def _input_handler(self, request: UserRequest) -> None:
	"""Callback function to handle user input."""
	if not request.files:
		return
	if not request.content:
		request.content = (
			"I uploaded, just text me back and confirm that you got the file(s)."
		)
	request.content += "\n**The user uploaded the following files: **\n"
	for file in request.files:
		self.input_files.append(file)
		request.content += f"[Attachment: {file.name}]\n"
		self.codebox.upload(file.name, file.content)
	request.content += "**File(s) are now available in the cwd. **\n"
执行和结果处理
通过 Agent Executor,已经能够实现自动的 prompt 到 code 的转化,下面我们来看看这段代码具体怎么执行:
def _connect(self) -> None:
	response = requests.post(
		f"{self.kernel_url}/kernels",
		headers={"Content-Type": "application/json"},
		timeout=90,
	)
	self.kernel_id = response.json()["id"]
	if self.kernel_id is None:
		raise Exception("Could not start kernel")

	self.ws = ws_connect_sync(f"{self.ws_url}/kernels/{self.kernel_id}/channels")
首先要通过 websocket 与特定的 kernel 进行连接,
self.ws.send(
	json.dumps(
		{
			"header": {
				"msg_id": (msg_id := uuid4().hex),
				"msg_type": "execute_request",
			},
			"content": {
				"code": code,
				# ...
			},
			# ...
		}
	)
)
之后通过 websocket 将代码发送给 kernel 执行,
while True:
    # ...
	if (
		received_msg["header"]["msg_type"] == "stream"
		and received_msg["parent_header"]["msg_id"] == msg_id
	):
		msg = received_msg["content"]["text"].strip()
		if "Requirement already satisfied:" in msg:
			continue
		result += msg + "\n"
		if settings.VERBOSE:
			print("Output:\n", result)

	elif (
		received_msg["header"]["msg_type"] == "execute_result"
		and received_msg["parent_header"]["msg_id"] == msg_id
	):
		result += received_msg["content"]["data"]["text/plain"].strip() + "\n"
		if settings.VERBOSE:
			print("Output:\n", result)

	elif received_msg["header"]["msg_type"] == "display_data":
		if "image/png" in received_msg["content"]["data"]:
			return CodeBoxOutput(
				type="image/png",
				content=received_msg["content"]["data"]["image/png"],
			)
		if "text/plain" in received_msg["content"]["data"]:
			return CodeBoxOutput(
				type="text",
				content=received_msg["content"]["data"]["text/plain"],
			)
		return CodeBoxOutput(
			type="error",
			content="Could not parse output",
		)
之后就是处理 channel message 中的一系列返回了:
- msg_type: stream,msg 中有 Requirement already satisfied: 则追加输出内容,继续等待 ws 返回
- msg_type: execute_result,将
msg["content"]["data"]["text/plain"]追加到输出内容,继续等待 - msg_type: display_data,获取
msg["content"]["data"],如果有 image/png,则把 png 包在 CodeBoxOutput 里返回,如果是 text/plain,同理返回。否则返回错误类型的输出,显示无法解析输出结果 - msg_type: status, execution_state: idle:代码执行成功但没有输出结果
- msg_type: error:直接报错
输出结果
在得到上述 CodeBoxOutput 输出后,就可以对输出进行处理了:对于文本类型的输出,不需要额外的处理,在运行过程中就通过 stdout 输出出来了;对于文件系统的操作,因为是通过 jupyter 直接进行的,所以也不需要在框架中额外处理,会自动落成本地的文件,直到需要对输出文件进行描述、解释,才需要做额外的处理。对于图片类型的输出,会在执行过程中将返回的图片 base64 保存在会话的 out_files 中,最后做输出处理时再转换为 Python 中标准的 Image 类型,之后通过 IPython 的 display 方法展示出来。
def get_image(self):
    # ...
	img_io = BytesIO(self.content)
	img = Image.open(img_io)

	# Convert image to RGB if it's not
	if img.mode not in ("RGB", "L"):  # L is for greyscale images
		img = img.convert("RGB")

	return img

def show_image(self):
	img = self.get_image()
	# Display the image
	try:
		# Try to get the IPython shell if available.
		shell = get_ipython().__class__.__name__  # type: ignore
		# If the shell is in a Jupyter notebook or similar.
		if shell == "ZMQInteractiveShell" or shell == "Shell":
			from IPython.display import display  # type: ignore

			display(img)
		else:
			img.show()
	except NameError:
		img.show()
内部落地的设想
如果要在公司内部落地 Code Interpreter,以下是一些我们可以关注到的点:
- 服务化或方案化
- 为平台已有模块提供基础执行能力或组件
- 给到内部需要做 Code Interpreter 的团队相关方案
- 对接内部模型
- 对接内部系统和环境,实现自动 API 调用
- 支持非 LangChain 的开放技术栈
写在最后
这次只是从大体流程和设计上过了一下 Code Interpreter 的实现方案,但里面还有很多微小但重要的细节没有讨论到,比如:怎么在网页而不是本地进行输出、遇到执行报错后怎么反馈给模型重新生成代码、遇到依赖包未安装怎么自动安装然后重新执行等,这都是一个健壮的 Code Interpreter 必须要考虑和实现的东西,社区的方案目前也是 MVP 版本,对 edge case 的处理和考虑离实际生产应用还有一些差距,要实现一个完善、生产可用的 Code Interpreter,还有不少路要走,手还得弄得更脏些。